The design is as shown in the figure below.

Click "New" .
Choose the operating system as linux debian (thats if its not selected for you)

Click next then choose create a virtual hard drive now. Leave the hard drive type as VDI and then click next. RAM of 512MB should be enough
Click Dynamically allocated and then choose the location on the hard drive to store the Vyatta virtual machine. I personally like to keep them on a separate partition from my running OS so that incase i have to reinstall my OS i dont have so much trouble.
Before starting the Vyatta vm, click on setting --> Network --> set adapter1 to bridged and adapter2 to internal Network. Click OK. we have to add an extra network interface since once interface will be for connection to the internet and the other one for dhcp for the internal clients.

Now we're ready to fireup our new vyatta router.
Select it from the list of OS's and click start
It will prompt you to select a startup disk and browse to the location of the vyatta iso image and click OK.

The VM should now start. This should present you with a vyatta terminal. Log in with credentials vyatta:vyatta on the vyatta terminal type: "install image" then type yes when prompted for installation on the harddrive. Accept to install on sda, and agree with the defaults by typing y whenever prompted.
After installation, the VM should reboot and then login with the credentials you set. For this tutorial we shall use vyatta:vyatta
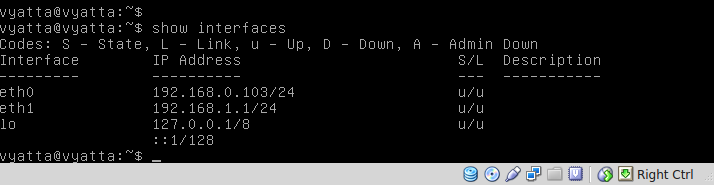
after logging in then type "show interfaces" This should bring a list of interfaces as shown in the screenshot.

Type: “set interfaces ethernet eth0 address dhcp”
Type: “set interfaces ethernet eth1 address 192.168.1.1/24”
Type: “commit” it should now tell you it’s starting DHCP client on eth0
Type: “save”
Type: “exit” this will remove the [edit] from above the prompt.
Type: "show interfaces" again to see if our new settings have taken effect. If everything is as shown in the screenshot below, then we should be able to start configuring services.
Type: "configure"
Type: “set service dhcp-server shared-network-name COMPANY subnet 192.168.1.0/24”
Type: “set service dhcp-server shared-network-name COMPANY subnet 192.168.1.0/24 default-router 192.168.1.1”
Type: “set service dhcp-server shared-network-name COMPANY subnet 192.168.1.0/24 dns-server 192.168.1.1”
Type: “set service dhcp-server shared-network-name COMPANY subnet 192.168.1.0/24 domain-name Vyatta.local”
Type: “set service dhcp-server shared-network-name COMPANY subnet 192.168.1.0/24 start 192.168.1.15 stop 192.168.1.200”
Type: “commit” if it sends any errors check if you missed any of these and try reducing the last number of the stop address
NB: you can replace COMPANY with a name of your choice.

Fire up your windows XP client and go the command terminal (start --> run --> type "cmd" --> press Enter)
at the command terminal type "ipconfig /release" to release all its current configurations. and then type: "ipconfig /renew" to obtain the settings from our newly configured vyatta dhcp server as shown in the screenshot below

Next step is to set up NAT.NAT will allow you to connect to the internet from any device on the private network.
type: "set nat source rule 10"
type: "set nat source rule 10 source address 192.168.1.0/24"
type: "set nat source rule 10 outbound-interface eth0"
type: "set nat source rule 10 translation address masquerade"
type: "commit"
type: "save"

We now return to our windows box and ping google's dns 8.8.8.8 as shown in the screenshot below "ping 8.8.8.8".

Type: "set service dns forwarding listen-on eth1"
Type: "set service dns forwarding name-server 8.8.8.8"
Type: "commit" this could take a second.
Type: "save"

we then return to our windows box and ping yahoo.com to test for connectivity.

To install web filtering capabilities, simply type: "run update webproxy blacklists" (This might take a while depending on your speed of connectivity).
We are then prompted whether we want the default blacklist downloaded for which we type y and press Enter.
This downloads the blacklists from the internet onto the vtyatta box.
type: "set service webproxy listen-address 192.168.1.1"
type: "set service webproxy url-filtering squidguard auto-update"
type: "set service webproxy url-filtering squidguard block-category porn"
type: "set service webproxy url-filtering squidguard block-category warez"
type: "set service webproxy url-filtering squidguard block-category proxy"
type: "commit"
type: "exit"


We then test from the client and you'll find that it cant even ping msn.com.

No comments:
Post a Comment